Tiger II vs 165 mm HESH Rounds
Today we will take a look at some very interesting weapons tests that involved firing 165 mm HESH rounds at a Tiger II. These tests took place in the latter half of the 1940s, when HESH was still a relatively new round that had potential against the newest wave of Soviet tanks.
The test began with a relatively good condition Tiger II, but after 12 HESH rounds it was reduced to a burning, cracked open hulk with only a few weld seams holding it together.
As this is often a misunderstood round, first we will do a quick overview of HESH.
If you already know what HESH is and does, skip to the Tiger II vs HESH section below.
What is HESH?
HESH, standing for High Explosive Squash Head, is a type of ammunition that is similar to HE (high explosive), but is particularly effective against armor. It is known by the US as HEP, or High Explosive Plastic. This type of ammunition is designed to flatten against armor before detonating, tearing off pieces of steel inside the tank.
HESH has been around since the beginning of the Second World War, where it started out mostly as a demolition round. The concept became more refined as the war went on, but even from its early days it was used for anti-tank work.
 A typical HESH round. Image by Mohit S CC BY 2.0.
During the early war years it was used on weapons such as the Blacker Bombard, a spigot mortar that fired large high explosive warheads for use against tanks.
As the war progressed other types of explosives were tested in varying levels and styles, and used in weapons such as the AVRE mortars. By July 1945 the theory was very much set. Tests demonstrated that such rounds were effective against armor in a tank versus tank capability.
How does HESH work?
A basic HESH round has three main parts: the shell, explosive filler and fuse.
The filler is a plastic explosive, which is soft and putty-like.
The nose will contain some type of soft, non-explosive padding that absorbs some of the impact to prevent the explosives from detonating too early. This material has been a variety of things over the years including tar, and in at least one test, peanut butter!
The fuse is at the rear, and is designed to detonate a few milliseconds after impact. This rear fuse is key to separating its purpose from the more common HE rounds.
 A HESH round diagram.
When fired, HESH rounds are noticeably slower in flight than conventional anti-tank rounds – often between 500 to 800 meters per second. If the velocity is too great, the HESH round will not work as intended.
If the pat has formed properly, then the shockwave from the explosive will travel through the steel until its energy is expended, or hits a vacuum. Compression waves rebound within the plate and impact each other, overmatching the steel’s tensile strength and causing it to fail. This results in a large flake of metal, known as a scab, breaking off inside that then becomes a deadly piece of shrapnel.
The scab, traveling at velocities up to 50% of the initial explosive velocity, will ricochet around the tank’s interior until its energy is spent, causing severe damage to anything squishy inside the tank and breaking open and damaging all but the hardest fittings. Smaller fragments will often break off the scab and radiate out in a shotgun type effect, depending on the size of the round striking, and the armor type and thickness.
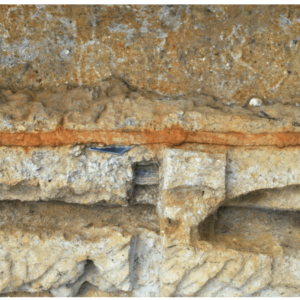
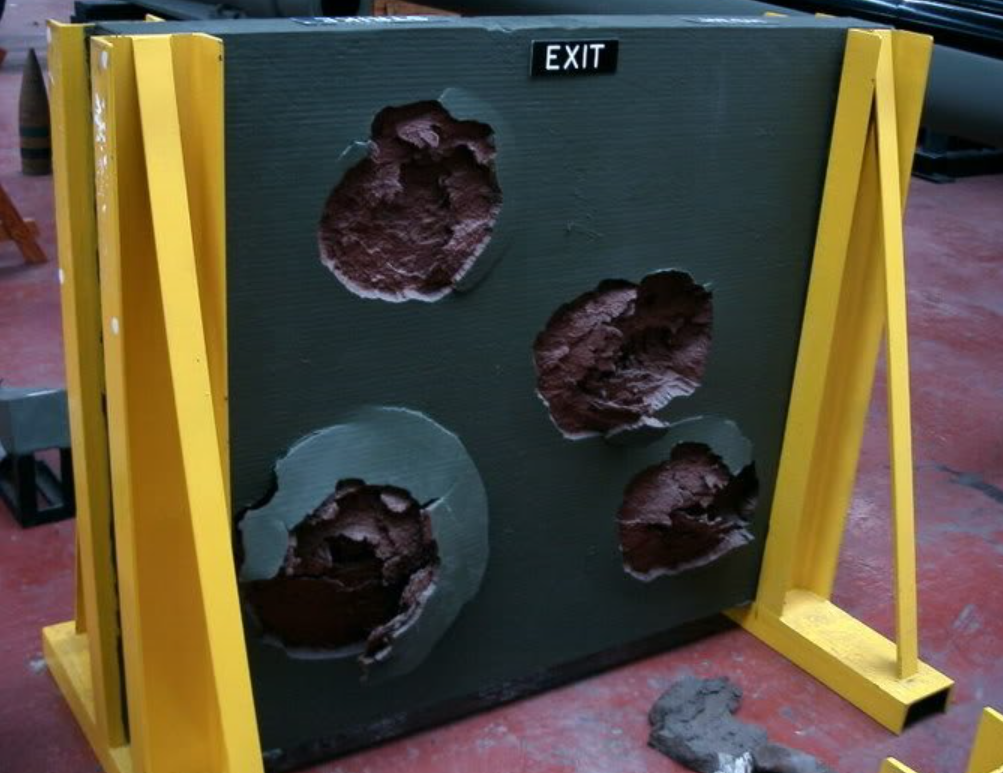 Damage caused by HESH rounds on the backside of an armor plate. The circles are where the scabs broke off.
When all goes to plan, a HESH round can completely devastate the interior of a tank without ever actually penetrating it in the conventional sense. HESH also has the secondary factor of simply carrying a large amount of explosives, which, even if a scab fails to form, can damage or destroy external fittings such as tracks, sensors, optics and weapons. Furthermore, aside from accuracy, HESH is not dependant on range.
That being said, HESH was not a ‘win all’ round, its effects can be heavily mitigated in several ways. First it is next to useless against modern composite armor types and spaced armor. Spaced armor can detonate the HESH round before it strikes the actual armor, stopping the explosive’s shockwave from being transmitted. Secondly, the type of armor itself – cast, rolled homogenous armor etc – plays an important part, as do any impurities or faults in the metal, which can affect the wave.
So, with how HESH works cleared up, lets take a look at how it performs in practice. Specifically, against a Tiger II.
HESH vs Tiger II
These tests occurred in August 1947 to study the effectiveness of the new 6.5-inch (165 mm) HESH rounds which were to be fitted to future AVREs, such as the Churchill and the proposed FV201 version. The Centurion would eventually use a 165 mm demolition gun as an AVRE, but there were no such plans at the time of this test, with just the MK4 mounting a 95 mm being considered.
While the AVRE was never considered a tank killer, they wanted to make sure it could defend itself if needed.
The Tiger II used in the test was one of several brought back to the UK. It was an older version with the pre-production turret used to test both land mines and these HESH shots, with the reasoning being that its armor was at least comparable to whatever the Soviets might be chucking out, and that the steel quality in the Tiger II, particularly the early ones, was pretty good. This is unlike the stock of Panthers we had, which had terrible steel and would give poor or misleading results.
 The Tiger II before any HESH rounds were fired at it.
Sadly however they did not record this Tiger II’s Fahrgestell Nummer (chassis number), with just 3529 recorded. The Tiger II was marked down as a non-runner, with its final drive and gearbox missing, although the engine was intact.
Inside, 38 inert 8.8 cm rounds were added into the usual spots, as well as having a bow machine gun fitted. In each seat, a straw-filled sack dummy was placed to observe any potential damage to the crew, and 1.6 mm thick witness plates were installed to show the travel of fragments inside . A mock-up transmission of 4 mm thick steel was added, and the documents note that the side skirts on the left side were a mix and match from both sides.
On the front left side of the turret, track links were used to test any effects they might have on the HESH rounds.
The HESH rounds were fired from a 6.5-inch gun mounted on a regular 6-inch gun mount, at about 50 ft distance from the tank.
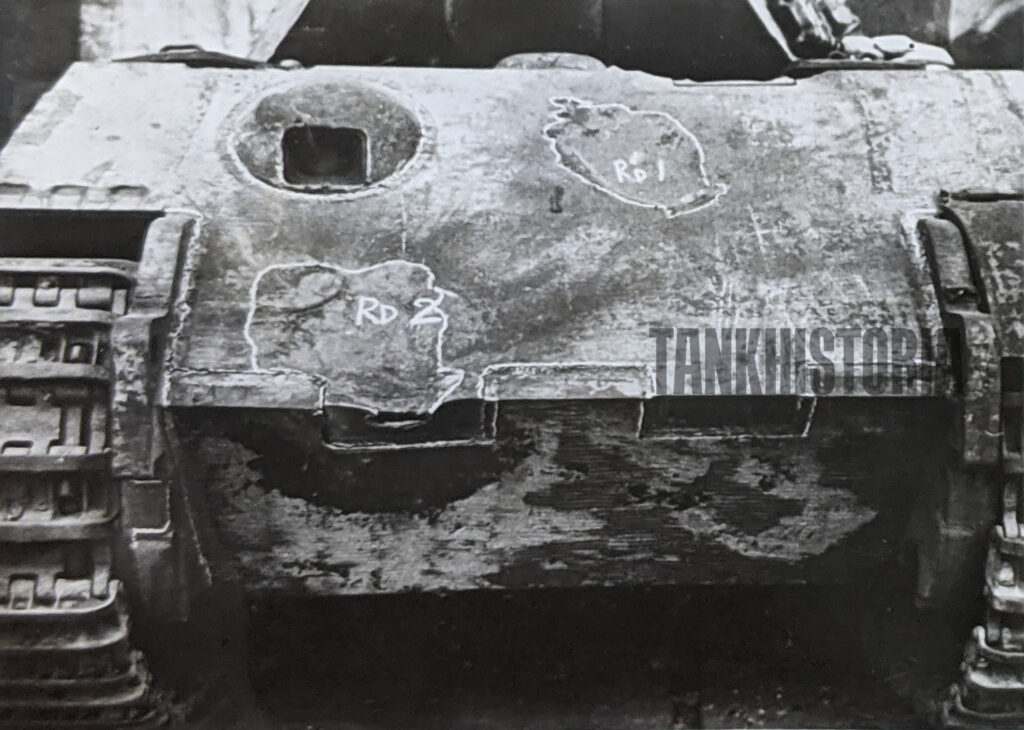
Shot 1
The first round stuck the upper glacis plate some 26 inches above the centreline. This hit caused an 18 x 14-inch wide dent 1 inch deep on the outside, pitted the gun heavily, broke the upper glacis/hull roof weld seam and dislodged the drivers’ plates.
 Upper glacis plate after shot 1.
The drivers’ scopes were damaged and the hull roof plates had fractures, while the hull machine gun fixture had a 28-inch crack. Finally the weld seams between the upper and lower glacis were broken.
Internally the story was even worse. The round broke off a 15.5 x 13 inch scab 1.5 inches thick and weighing 61lb (27.6kg). This scab went through the steel mockup final drive – which would have rendered any real vehicle immobile. Fragments damaged the bow machinegun but not the gunner, and the driver would have lost an arm and a leg.
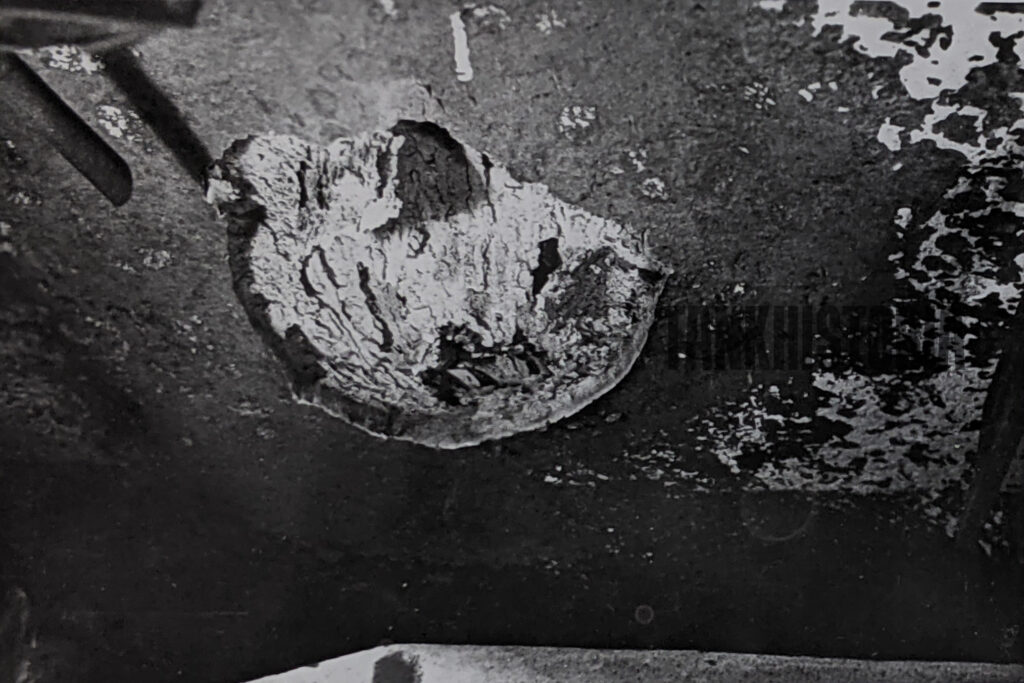 Inside view of shot 1, showing the area the scab detached off the 150 mm thick upper glacis plate.
However, the turret crew was untouched by the round.
This single strike, although not completely fatal, would have rendered any tank immobile and the hull requiring a factory rebuild to fix.
Shot 2
The second round was fired 30 degrees off center of the Tiger, to represent the vehicle trying to angle its armor.
The front received a dent 18 x 17 inches by 1 inch deep. The welds between the upper and lower glacis were broken, and cracks formed up the glacis side. On the left of the tank the upper hull and pannier side developed a long crack, while the lower nose and hull floor developed a 17-inch fracture.
 The Tiger II’s upper glacis after shot 2. Note the cracked welds on the upper and low glacis interlocks.
Internally a 15 x13 inch scab 1.5 inches thick and weighing 74 lbs formed and shot into the forward steel mockup transmission destroying it. Internally, cracks and distortions were present and daylight could be seen through the gaps, however the witness plates indicated that apart from a mobility kill the crew would have survived this shot.
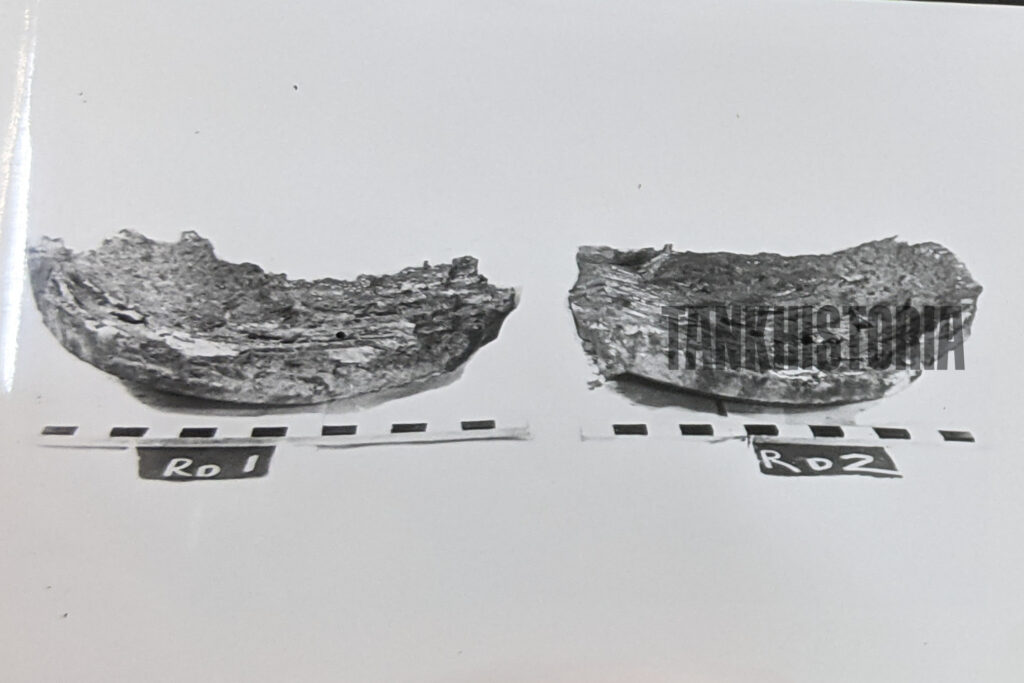 The scabs that broke off inside the tank from shots 1 and 2.
Shot 3
Next up was the turret.
Shot 3 was aimed at the turret’s front right cheek but went a little higher than planned. The round left a 12 x 9-inch dent and broke the joint between the side and frontal turret armor, separating the parts quite visibly. The welds down to the turret ring were cracked.
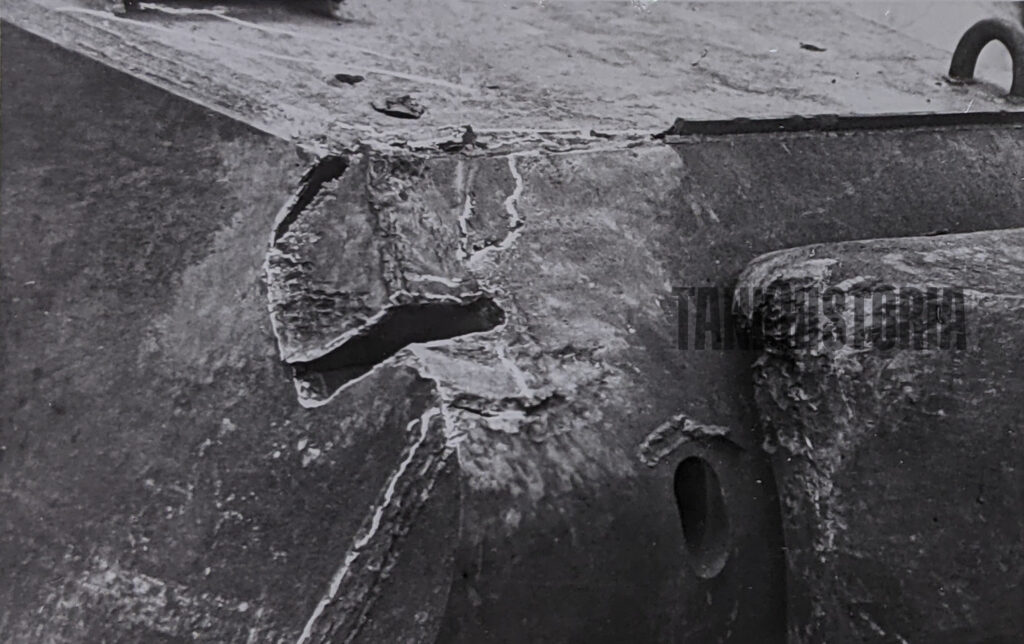 Impact of shot 3, which completely destroyed the upper welds between and the front and side turret armor. Even part of the water deflector above the machine gun port has been blown away.
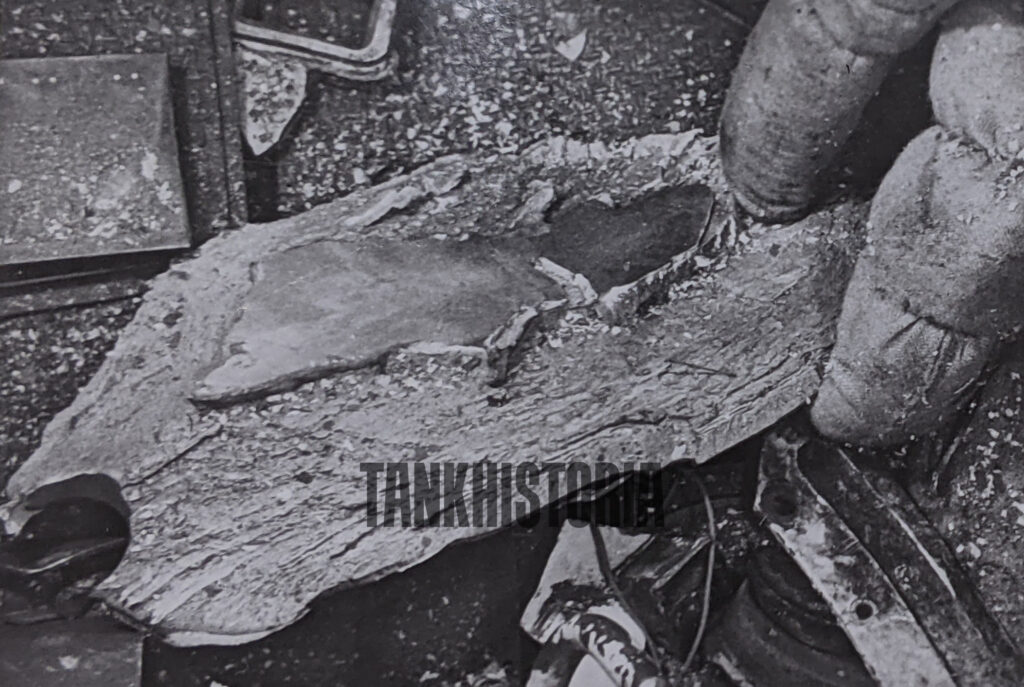
The top of the turret had two distinct cracks in the steel but both hatches remained operational. Inside an 8.5 x 7.5-inch scab was found 6 ft away, while the witness plates were peppered with lighter spall. The scab had destroyed the machinegun, the main gun breech, and the turret race bolts.
The straw dummies were then inspected.
 Internal view of the turret front after shot 3. The 100 mm thick front armor has lost a large scab. For reference, the 8.8 cm gun is on the left.
Shot 4
The fourth shot hit the front left turret cheek. The armor did not scab as the round was not a clean hit. The armor managed to hold, but it still bulged in and the resulting dent jammed the turret and disabled the gun. The straw crew were not injured.
 Shot 4 hit the left turret cheek. It hit at a steep angle and caused little damage, although the gun was jammed in position and some welds cracked.
Shot 5
Round 5 was fired at the front left turret side, which was fitted with track links. These were quite effective at preventing damage to the tank, with the air pocket between the links and the armor dispersing much of the energy. Large splits were formed along the interlocking weld lines, but these were discounted as they likely to have been weakened by the previous strike.
 This is the damage after shot 5, which hit the track links hung on the side of the turret. The links were blown clear, but appear to have done a good job at reducing the HESH’s effects.
Shot 6
Round 6 was the heaviest blow the vehicle suffered, striking the right side of the turret at a 30 degree angle. The 80 mm-thick armor here completely caved in leaving a 20 x 16-inch hole in the turret side. The impact dislodged the 13-ton turret, lifting it up and out of its ring in the opposite direction.
 The damage from shot 6. The entire turret was shoved upwards and to the left, and a 20 inch hole was opened in the turret side.
The inside story was far worse for the straw crew; a scab 35 x 19 inches weighing 241 lb or 109 kg smashed around inside the tank. The loader was vaporized into loose horse food, while the scab struck the gun breach, breaking it. The gun shield itself was found wedged into the turret floor on the opposite side.
Both dummy crews were found to be in a bad state from a mixture of particle strikes and the turret being shunted so violently. The ammunition was dislodged and ricocheted around the tank, but miraculously none of it was perforated, although it was still deemed unusable afterward.
 The huge chunk of armor blown inwards from shot 6. The hole allowed the blast to enter the inside of the fighting compartment, which alone would have likely killed the crew.
Shot 7
Next up was a shot to the skirting plates along the right side of the tank’s hull. The skirts blew off, with one recovered 100 yards away, which might have worried the testing crew who were situated closer than this!
The pannier sides were split along the welds and although, like the track links, the majority of the explosion was contained by the spaced side skirts, the ammunition was still badly dented but not destroyed.
The wireless operator was killed and the replacement loaders legs were shorn off. Two track links were ripped apart, 2 more were damaged and some minor damage to the wheels was observed.
Shot 8
Round 8 was used to see how well it could immobilize a target. The front left mudguard was struck, removing it and blowing off the tracks. The drive sprocket was severely damaged and bent back and torn from its housing. This damage was deemed irreparable without a factory overhaul due to the large fractures and dislodged metal, however, no damage was done to the crew or the internal aspect of the tank.
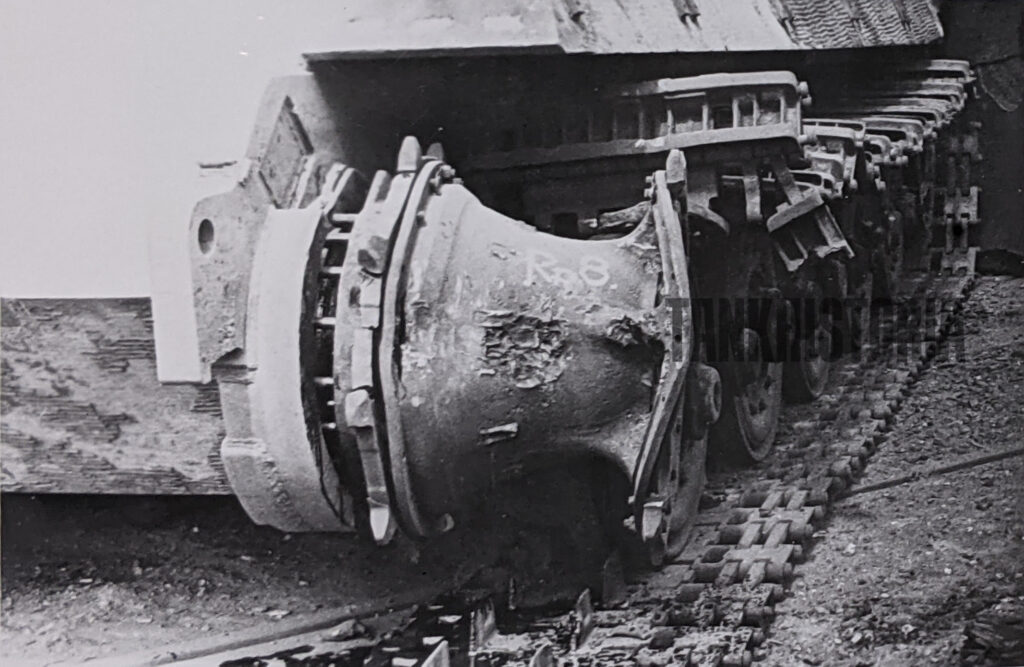 The left sprocket after shot 8. It blew off the tracks and tore the sprocket away from the final drive.
Shot 9
Round 9 was the sneaky ‘shot in the back tactic’ with the removable rear turret door chosen as a target in the hopes of assessing damage to the engine deck below.
The door itself was blown inwards in three pieces and found scattered over the turret floor, while the securing bolts and fixtures were found in the front right of the turret. Welds on both sides of the turret rear were cracked. All crew was perforated by debris and considered to have been killed – the team was running out of straw dolls at this point.
 The turret rear after shot 9. The entire door and parts of the upper frame were forced inside the turret.
The turret itself was lifted up and moved forwards 2 inches, while 5 inert rounds were punctured, resulting in what would have been an ammo rack explosion. The engine deck received virtually no damage.
Shot 12
The last shot of interest was the twelfth round, which hit the rear left side beside the engine compartment. The round perforated the side plate, leaving a clean hole 10 x 5-inches scabbing a 24 x 16-inch hole into the side pannier.
 Shot 12, which opened this whole in the left side of the hull.
For this test the fuel tanks had been partially filled. They immediately set the engine alight, which developed into an uncontrollable blaze gutting the tank. The engine was badly damaged and internal fittings were buckled and caved in.
After this the vehicle was essentially useless; the fire meant the steel would not be usable for future tests and no more data is known on the vehicle.
 The Tiger II on fire after shot 12, concluding the test.
The overall conclusion was that HESH rounds were capable of causing severe injury to the crews, while shots to tracks and running gear would immobilize the vehicle, or, in the case of an engine shot, cause fires.
However, external track links were effective counters, and side skirts provided some protection.
News
The Hanging Temple: China’s 1,500-Year-Old Cliffside Marvel of Faith and Engineering
The Hanging Temple: China’s 1,500-Year-Old Cliffside Marvel of Faith and Engineering Perched precariously on the cliffs of Mount Heng in Shanxi Province, China, the Hanging Temple, also known as Xuankong Temple, Hengshan Hanging Temple, or Hanging Monastery, is an architectural…
The Willendorf Venus: A 30,000-Year-Old Masterpiece Reveals Astonishing Secrets
The Willendorf Venus: A 30,000-Year-Old Masterpiece Reveals Astonishing Secrets The “Willendorf Venus” stands as one of the most revered archaeological treasures from the Upper Paleolithic era. Discovered in 1908 by scientist Johann Veran near Willendorf, Austria, this small yet profound…
Unveiling the Maya: Hallucinogens and Rituals Beneath the Yucatán Ball Courts
Unveiling the Maya: Hallucinogens and Rituals Beneath the Yucatán Ball Courts New archaeological research has uncovered intriguing insights into the ritual practices of the ancient Maya civilization. The focus of this study is a ceremonial offering found beneath the sediment…

Uncovering the Oldest Agricultural Machine: The Threshing Sledge’s Neolithic Origins
Uncovering the Oldest Agricultural Machine: The Threshing Sledge’s Neolithic Origins The history of agricultural innovation is a fascinating journey that spans thousands of years, and one of the earliest known agricultural machines is the threshing sledge. Recently, a groundbreaking study…
Nara’s Ancient Sword: A 1,600-Year-Old Protector Against Evil Spirits
Nara’s Ancient Sword: A 1,600-Year-Old Protector Against Evil Spirits In a remarkable discovery that has captured the attention of archaeologists and historians alike, a 7.5-foot-long iron sword was unearthed from a 1,600-year-old burial mound in Nara, Japan. This oversized weapon,…
The Inflatable Plane, Dropped Behind the Lines for Downed Pilots
Experimental The Inflatable Plane, Dropped Behind the Lines for Downed Pilots The Inflatoplane from Goodyear was an unconventional aircraft developed by the Goodyear Aircraft Company, a branch of the renowned Goodyear Tire and Rubber Company, also famed for the Goodyear…
End of content
No more pages to load