HMS Royal Oak was Sunk at Scapa Flow by a U-Boat
HMS Royal Oak was a Revenge-class battleship of the Royal Navy, commissioned in 1916, and notable for its participation in the Battle of Jutland during World War I.
Despite its formidable design and armament, the ship tragically sank at Scapa Flow on October 14, 1939, after being torpedoed by the German submarine U-47, resulting in the loss of 835 crew members.
Design of HMS Royal Oak
The HMS Royal Oak, a member of the Revenge-class battleships, was a product of the intense naval arms race that characterized the early 20th century. The Revenge-class was conceived as an improvement upon the preceding Queen Elizabeth class, emphasizing firepower, protection, and operational range to maintain British naval supremacy.
Laid down at the Devonport Dockyard on January 15, 1914, and launched on November 17, 1914, Royal Oak was officially commissioned into the Royal Navy on May 1, 1916. The ship’s design reflected the strategic priorities of the era, which included countering the German High Seas Fleet and protecting vital sea lanes.
The design philosophy of the Revenge-class prioritized heavy armament and substantial armour. The primary armament consisted of eight 15-inch (381 mm) Mk I guns, mounted in four twin turrets. These guns were among the most powerful naval artillery pieces of the time, capable of firing a 1,920-pound shell over 20 miles. This firepower gave the Royal Oak the ability to engage enemy ships at long distances, a critical advantage in naval battles.
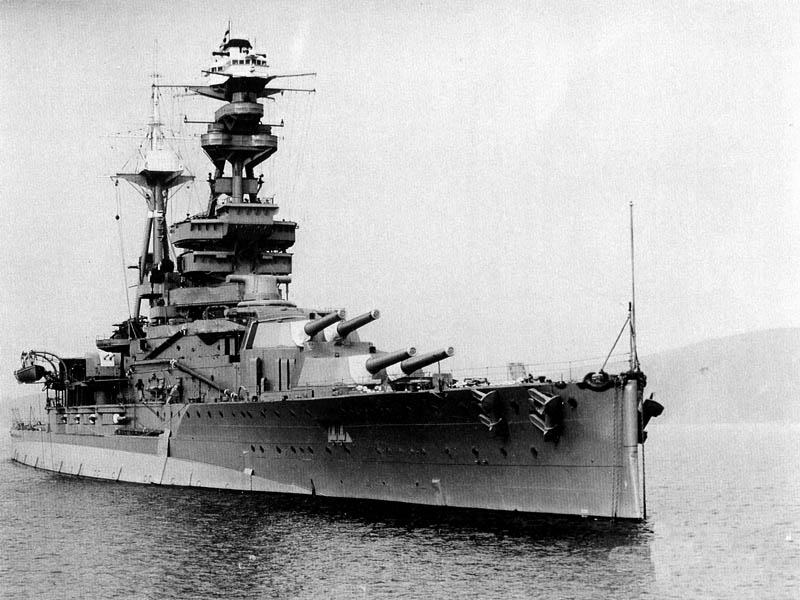
 A port side view of HMS Royal Oak in 1937.
The HMS Royal Oak measured 620 feet in length overall and had a beam of 88 feet. The ship’s displacement was approximately 29,000 tons at normal load, which could increase to over 31,000 tons when fully loaded. These dimensions made Royal Oak a formidable presence on the seas, able to withstand significant damage while delivering powerful broadsides.
Propulsion was provided by four Parsons steam turbines, each driving a separate propeller. These turbines were powered by eighteen Babcock & Wilcox boilers, which generated a total of 40,000 shaft horsepower. This propulsion system allowed Royal Oak to achieve a top speed of 21 knots (24 mph; 39 km/h), which was relatively fast for a battleship of its size and era. The ship’s range was also impressive, capable of steaming approximately 7,000 nautical miles at a cruising speed of 12 knots, which was crucial for extended operations without frequent refuelling.
The armor protection of HMS Royal Oak was one of its defining features. The main belt armor, which protected the ship’s vitals, was up to 13 inches (330 mm) thick. This belt extended along the sides of the ship, providing substantial protection against shellfire. The main turrets and barbettes, housing the 15-inch guns, were similarly well-protected, with turret armor up to 13 inches thick and barbette armor up to 10 inches (254 mm) thick.
 The Royal Marines on board HMS Royal Oak help to clean one of the 15 inch guns.
The ship’s deck armour varied in thickness, with the most critical areas covered by up to 4 inches (102 mm) of armour. This horizontal protection was designed to defend against plunging fire from long-range artillery and aerial bombs. The conning tower, from which the ship was commanded during battle, had armour up to 11 inches (279 mm) thick, ensuring the safety of command personnel.
The ship’s construction was part of a broader expansion of the Royal Navy under the auspices of the Naval Defence Act of 1889, which aimed to ensure that the British fleet was at least as powerful as the next two largest navies combined.
One of the notable technological features of the Royal Oak was the use of improved fire control systems. These systems included rangefinders and centralized fire control, which allowed for more accurate targeting and coordination of the ship’s main and secondary batteries. The integration of these systems marked a significant advancement in naval gunnery, enhancing the ship’s combat effectiveness.
Throughout its service life, HMS Royal Oak underwent several refits and upgrades to maintain its combat capabilities and address evolving threats. These included enhancements to the ship’s anti-aircraft defenses, the installation of more advanced radar and communication equipment, and modifications to improve crew accommodations and operational efficiency.
HMS Royal Oak in WWI
Commissioned in May 1916, HMS Royal Oak was quickly integrated into the Grand Fleet, which was the main fleet of the Royal Navy based at Scapa Flow in the Orkney Islands. The Grand Fleet’s primary mission was to engage and neutralize the Imperial German Navy’s High Seas Fleet, thereby ensuring British dominance over the North Sea and safeguarding maritime trade routes.
The most notable action involving HMS Royal Oak during World War I was the Battle of Jutland, which took place from May 31 to June 1, 1916. This battle was the largest naval engagement of the war and involved a clash between the British Grand Fleet, under the command of Admiral Sir John Jellicoe, and the German High Seas Fleet, commanded by Vice-Admiral Reinhard Scheer.
 The crew of the HMS Royal Oak taking on 15 inch rounds.
During the battle, Royal Oak was part of the 4th Battle Squadron, which played a key role in the engagement. The battle began with the British Battlecruiser Fleet, under Vice-Admiral David Beatty, encountering the German scouting group. As the main fleets converged, Royal Oak and other battleships of the Grand Fleet steamed into action to support Beatty’s forces.
Royal Oak’s position in the line of battle allowed it to bring its powerful 15-inch guns to bear on the German fleet. Throughout the engagement, Royal Oak fired a total of 38 rounds from its main battery. Despite the ship’s formidable firepower, it did not achieve any significant hits on enemy vessels. The battle was characterized by chaotic maneuvering and the difficulty of maintaining effective gunnery amid the smoke and confusion of combat.
Although Royal Oak did not inflict major damage on the enemy, it also emerged from the battle relatively unscathed. The ship sustained minor damage from near-miss hits and shrapnel, but there were no critical hits that compromised its combat effectiveness.
The Battle of Jutland itself ended inconclusively, with both sides claiming victory. While the British Grand Fleet maintained control of the North Sea, the German High Seas Fleet demonstrated its ability to challenge British naval supremacy. The battle resulted in significant losses on both sides, with the British losing 14 ships and over 6,000 men, and the Germans losing 11 ships and around 2,500 men.
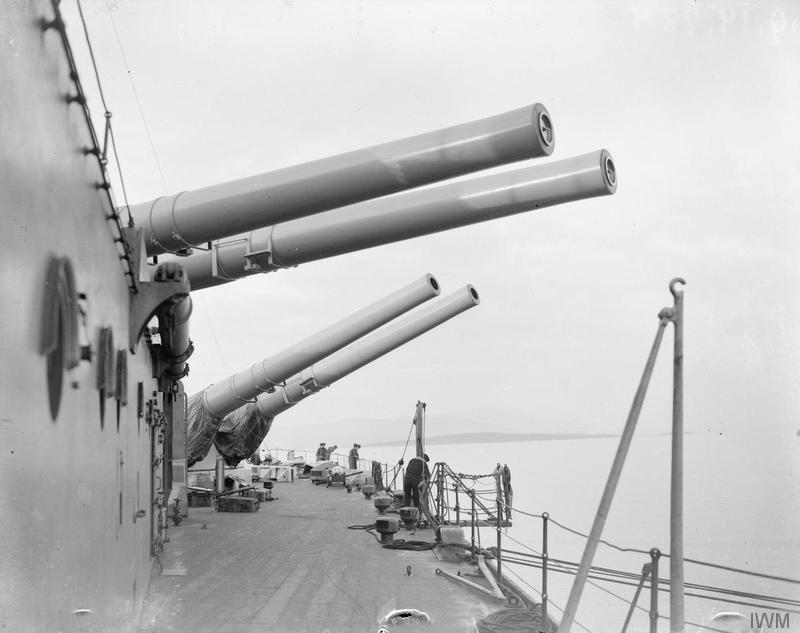 The big ol’ 15-inch boom sticks…
Following the Battle of Jutland, HMS Royal Oak continued to serve with the Grand Fleet for the remainder of the war. The ship participated in various fleet exercises and patrols, aimed at deterring further German naval operations and protecting Allied shipping. The presence of battleships like Royal Oak in the North Sea acted as a significant strategic deterrent, limiting the operational freedom of the German fleet.
The Interwar Period
After World War I, the Royal Navy faced the challenge of maintaining a powerful fleet amidst budgetary constraints and changing political landscapes. HMS Royal Oak, like many other warships of the time, was retained in the fleet but saw a shift in its operational focus from wartime engagements to peacetime duties.
During the 1920s, Royal Oak served with the Atlantic Fleet, which was later redesignated as the Home Fleet. The ship participated in numerous naval exercises, fleet reviews, and goodwill visits. These activities were aimed at demonstrating the continued strength of the Royal Navy, fostering international relations, and maintaining the operational readiness of the fleet.
One of the most notable incidents during the interwar period involving HMS Royal Oak was the Mutiny of the Atlantic Fleet in 1931. This event, also known as the Invergordon Mutiny, occurred when sailors aboard several ships, including Royal Oak, protested against pay cuts and poor living conditions.
In the aftermath of the Great Depression, the British government implemented austerity measures, including significant reductions in naval pay. These cuts disproportionately affected the lower ranks, leading to widespread discontent among the sailors. The mutiny at Invergordon, which took place on September 15-16, 1931, saw crews refusing orders and staging protests.
The mutiny was resolved without violence, and the government quickly rescinded the pay cuts in response to the sailors’ grievances. However, the event highlighted the challenges faced by the Royal Navy during the interwar period, including maintaining morale and ensuring adequate living conditions for its personnel.
Read More The Sinking of the German Battleship Bismarck
Throughout the interwar years, the Royal Navy had to navigate a complex geopolitical environment. Treaties such as the Washington Naval Treaty of 1922 and the London Naval Treaty of 1930 aimed to limit naval armaments and prevent an arms race. These treaties imposed restrictions on the construction of new battleships and mandated reductions in naval tonnage.
As a result, the Royal Navy focused on modernizing existing ships like HMS Royal Oak to comply with treaty limitations while maintaining a formidable fleet. These modernization efforts were critical for ensuring that the Royal Navy could meet its strategic objectives without breaching treaty obligations.
 The crew cleaning her deck.
As the 1930s progressed, the geopolitical landscape became increasingly tense, with the rise of fascist powers in Europe and the growing threat of another major conflict. The Royal Navy began to prepare for the possibility of war, and HMS Royal Oak was once again at the forefront of these preparations.
The ship’s final refit in the late 1930s focused on further enhancing its combat capabilities. Improvements were made to its anti-aircraft defenses, and additional radar equipment was installed to improve situational awareness and targeting accuracy. These upgrades were crucial for ensuring that Royal Oak could effectively counter the emerging threats posed by more modern enemy aircraft and submarines.
The Second World War
With the outbreak of World War II in September 1939, HMS Royal Oak found itself once again at the center of a global conflict. Although it was an older battleship by the standards of the late 1930s, Royal Oak still played a vital role in the early stages of the war, particularly in the defense of the British naval base at Scapa Flow.
Scapa Flow, located in the Orkney Islands, was one of the most important naval anchorages for the Royal Navy. Its strategic location provided a secure base from which the Royal Navy could control access to the North Sea and the Atlantic Ocean. Scapa Flow’s natural geography offered protection from enemy surface ships, making it a key stronghold in Britain’s naval defense strategy.
HMS Royal Oak was stationed at Scapa Flow as part of the Home Fleet, tasked with protecting the base and the surrounding waters from potential German naval and aerial attacks. The presence of Royal Oak and other battleships at Scapa Flow was intended to deter any aggressive moves by the Kriegsmarine, the German Navy.
 One of the 3-inch anti-aircraft guns on board the ship.
In the initial months of World War II, Royal Oak’s duties primarily involved defensive operations. The ship’s main role was to serve as a floating fortress, providing anti-aircraft and surface defense for Scapa Flow. Despite being an older vessel, Royal Oak was still considered a formidable asset due to its heavy armor and powerful main guns.
The early months of the war were characterized by a sense of urgency and heightened alertness. The Royal Navy was acutely aware of the threat posed by German U-boats and surface raiders. However, despite extensive measures to secure Scapa Flow, the anchorage was not impregnable. The defenses included blockships sunk in strategic channels, anti-submarine nets, and patrols, but gaps in these defenses were still present.
The Sinking of HMS Royal Oak
German intelligence had gathered detailed reconnaissance on Scapa Flow, identifying potential weaknesses in the base’s defenses. Lieutenant Günther Prien, commander of the German submarine U-47, was tasked with an audacious mission to infiltrate Scapa Flow and attack the anchored British fleet. Prien, an experienced and daring submariner, meticulously planned the operation, exploiting gaps in the defenses.
On the night of October 13, 1939, U-47 approached Scapa Flow under the cover of darkness. The weather conditions were favorable for a stealth approach, with overcast skies and minimal moonlight. Prien skillfully navigated through the narrow Kirk Sound, maneuvering past the blockships intended to block the entrance. Despite the risk of detection, U-47 managed to slip through the defensive barriers and enter the anchorage undetected.
Once inside Scapa Flow, Prien had to quickly identify a target among the shadowy outlines of the anchored warships. He selected HMS Royal Oak, one of the older but still formidable battleships, as his primary target. At around 1:00 AM on October 14, U-47 fired a spread of torpedoes at Royal Oak.
The first torpedo struck Royal Oak’s bow, causing a minor explosion that was initially dismissed by the crew as an internal malfunction or a minor incident. This misjudgment meant that the crew did not immediately take defensive actions or sound the alarm.
Prien then maneuvered U-47 to fire a second salvo of torpedoes. These torpedoes struck the midsection and stern of the battleship with devastating effect. The explosions caused catastrophic damage, rupturing the ship’s hull and allowing water to flood into the compartments. The impact was so severe that the ship quickly began to list to starboard.
 The German battleship Scharnhorst welcomes the U-Boat U-47 back after her mission to sink HMS Royal Oak in Scapa Flow.
The rapid flooding overwhelmed the ship’s internal compartments, making damage control efforts futile. Within minutes, Royal Oak was listing heavily, and the order to abandon ship was given. However, the suddenness of the attack and the rapid sinking left little time for an orderly evacuation.
HMS Royal Oak capsized and sank in less than fifteen minutes after the torpedoes struck. Out of the 1,234 officers and men on board, 835 perished, including Rear Admiral Henry Blagrove. Many of the crew were trapped below decks, unable to escape the flooding compartments. The survivors, many of whom had been asleep at the time of the attack, found themselves in the frigid waters of Scapa Flow, struggling to stay afloat until rescue efforts could be mounted.
The loss of life was immense and deeply felt within the Royal Navy and the wider British public. The sinking of such a significant battleship in the supposedly secure anchorage of Scapa Flow was a shocking event. The news of the attack reverberated across Britain, highlighting the deadly effectiveness of German U-boat operations and the vulnerabilities of even the most secure naval bases.
The sinking of HMS Royal Oak had immediate and long-term implications for naval strategy and defense. The Royal Navy quickly recognized the need to bolster its defensive measures at Scapa Flow and other key anchorages. Additional blockships were sunk, anti-submarine nets were reinforced, and patrols were increased to prevent any future incursions.
News

The Hanging Temple: China’s 1,500-Year-Old Cliffside Marvel of Faith and Engineering
The Hanging Temple: China’s 1,500-Year-Old Cliffside Marvel of Faith and Engineering Perched precariously on the cliffs of Mount Heng in Shanxi Province, China, the Hanging Temple, also known as Xuankong Temple, Hengshan Hanging Temple, or Hanging Monastery, is an architectural…

The Willendorf Venus: A 30,000-Year-Old Masterpiece Reveals Astonishing Secrets
The Willendorf Venus: A 30,000-Year-Old Masterpiece Reveals Astonishing Secrets The “Willendorf Venus” stands as one of the most revered archaeological treasures from the Upper Paleolithic era. Discovered in 1908 by scientist Johann Veran near Willendorf, Austria, this small yet profound…
Unveiling the Maya: Hallucinogens and Rituals Beneath the Yucatán Ball Courts
Unveiling the Maya: Hallucinogens and Rituals Beneath the Yucatán Ball Courts New archaeological research has uncovered intriguing insights into the ritual practices of the ancient Maya civilization. The focus of this study is a ceremonial offering found beneath the sediment…

Uncovering the Oldest Agricultural Machine: The Threshing Sledge’s Neolithic Origins
Uncovering the Oldest Agricultural Machine: The Threshing Sledge’s Neolithic Origins The history of agricultural innovation is a fascinating journey that spans thousands of years, and one of the earliest known agricultural machines is the threshing sledge. Recently, a groundbreaking study…
Nara’s Ancient Sword: A 1,600-Year-Old Protector Against Evil Spirits
Nara’s Ancient Sword: A 1,600-Year-Old Protector Against Evil Spirits In a remarkable discovery that has captured the attention of archaeologists and historians alike, a 7.5-foot-long iron sword was unearthed from a 1,600-year-old burial mound in Nara, Japan. This oversized weapon,…

The Inflatable Plane, Dropped Behind the Lines for Downed Pilots
Experimental The Inflatable Plane, Dropped Behind the Lines for Downed Pilots The Inflatoplane from Goodyear was an unconventional aircraft developed by the Goodyear Aircraft Company, a branch of the renowned Goodyear Tire and Rubber Company, also famed for the Goodyear…
End of content
No more pages to load